Showing posts with label WAYM Wednesday. Show all posts

Wednesday, January 8, 2014

WAYM Wednesday: Musings

Just a quick dispatch from me today, folks. I'm settling back into my regular work schedule after a nice break over the holidays, and remembering things like traffic, and packing lunches, and car troubles that lead to late days, meetings and the emails before and after, and the simple math that getting home at 6 with no plan for dinner and ingredients that are either frozen or nonexistent adds up to a much later evening (and less knitting time) than I desire. Time to actually plan my grocery trips again. I can't complain, though - I am employed, doing engaging work, and if a car breaks down that's ok because we have two, and tonight, while not as planned, has turned into a fine evening.

We went out to eat and had our fill of bready goodness:


Then went to the library, where I picked up my reserved copy of Clara Parkes' "The Knitter's Book of Socks", which I am now enjoying with a hot cup of tea and some knitting: 


And now I am reclaiming my evening by writing only a short post (from an iDevice, no less, since I left my laptop at work. Tonight, I am making time to relax and unwind. 

A few links for you to check out:

The Knitting Sarah is hosting a year-long sock knitting party. The goal is to fit socks into our daily knitting lives. Intriguing, but as I've yet to knit a single pair for myself I'm not sure I'm ready for that. I'll be watching with interest, though!
 http://knittingsarah.com/2014/01/01/2014-kal-socks-with-sarah/

A lot of folks on Social Media are embarking on a Year of Making. Make something every day, post a photo. Again intriguing, but I feel like the only effect it would have on me us to force me to Instagram daily. I'm not sure if that's useful. http://www.kimwerker.com/2014/01/02/a-year-of-making/ Also, Kim Werker is cool. You should check her out. 

Happy crafting, everyone! What are you making?

Wednesday, December 18, 2013

WAYM Wednesday Guest Post: Metalworking with TheActualDaleFishman!


Welcome to another What Are You Making Wednesday! This week, I have a special guest post for you: my little-brother-in-law TheActualDaleFishman will be sharing how to make your very own Batman Begins Batarang. Don't know what a Batarang is? (I didn't either.) It's similar to a throwing star, but shaped like the Batman symbol.

Like this:


In other news, my Secret Christmas Crafting is complete - plenty of time to spare. Now I get to plug away at my new sweater that I haven't shown you yet - next week, maybe. I might do a very quick/short post around Christmas, as I'm sure I'll be knitting away all through the holidays.

With that, take it away, Fishman!


Hi everyone! @Theactualdalefishman here and I am here to show you what I made for "What are you making Wensday"!

This will be a tutorial for my homemade Batman begins Batarang.


There are many interpretations of the famous "Batarang", Batman's most handy and well-known gadget, Such as Batman's fold-up version in Arkham city, or the classic-Batman Batarangs from the comics!
But I have made the famous Batarang from Christopher Nolan's "Batman Begins".


I am a big nerd about Christopher Nolan's Dark knight series, and decided that I wanted to have my own little bit of Batman at home, and today I am going to show you how I made it!

*WARNING: The sheet metal and the tools used for this project can be sharp and can easily hurt or injure yourself with them! Please use gloves for this and be careful while making this.*


THE TEMPLATE


First off I started with a simple Google image search and found a great template for the Batarang.

You can view it here:


When I printed it out, the paper turned out to be just a little smaller than the actual measurements, but I prefer it like that.

Next I carefully cut out the paper Batarang and taped (glue will work allot better) it onto a piece of very thin cardboard. And then I cut out the shape of the Batarang with an Xacto knife.

*I would show you a picture of the cardboard template, but it got destroyed in the process of making the finished product.*

THE METALWORK


For the actual metal part I used scrap-steel sheet metal for it (The thickness of the metal is up to you depending on what you want the weight to be).


Next I glued the template to the metal trying to save as much extra-metal as I could for future projects, and waited for it to dry. (Elmer's glue will work fine for this.)

Once the glue was dry, I then began to cut a square as close as possible to the template with a tool called a Beverly sheer, a tool with a lever that is made for cutting metal and other things. But as long as you can cut the metal, it doesn't matter what you use to cut it.


Once we have a smaller object to work with, we can begin the more detailed cutting.

THE JEWELER'S SAW


Now is the more slower-moving process. I had my dad teach me how to use a jeweler's saw to help with making it and I think the best results you can get with a Batarang is with that.


I will not explain exactly how to use a jeweler's saw since there are probably plenty of instructions online on how to use one. A clamp that can hold the piece of metal flat and off the edge of a table is recommended to use to cut it. Remember to slowly cut and take your time with a jeweler's saw... Or else you will break the blade. (Thank goodness for cheap-priced blades!)

The pointy-ness of the ears will not matter when you cut them out, for it will be filed down later.

The outcome of it should look like this:


GRINDING IT DOWN


The next step is to use a file (preferably a rounded one) and start filing down all of the curved sides and in-between the ears (And sharpen the ears all you want now.


And the last step is using a belt grinder to grind down all of the shapes of the extra details into the Batarang ( I had my dad help me with that), and to grind down the faces to make them shinny and clean.
And as for Sharpness, I prefer to have mine sharp, but that is your decision to make.


A belt grinder can be a very dangerous machine if not used with much caution... It may not look very dangerous, but it can cause serious injuries. Be very careful while using it!

THE FINISHED PRODUCT


And after all of that you are done! And if you are keen on making another one, than you can just trace this one onto more sheet metal instead of having to glue a cardboard template on it, and follow the same steps again!


This is throwable and if the edges are sharpened it will stick into wood and (if you are not using thin metal) not bend or warp.

I hope you enjoyed my tutorial!
Special thanks to Amanda for letting me guest on her blog!

Have fun!

~Theactualdalefishman~


Hope you enjoyed that! I am super excited to have my very first guest poster. I feel like a real blogger now.

So, what are you making? If you'd like to be featured for a guest post, let me know - I'd love to use this blog as a place to share others' work as well as my own. 

Wednesday, December 11, 2013

WAYM Wednesday: Makin' a List

This week I've been mostly working on secret Christmas stuff, and I already taunted you with a post of sneaky closeups and blurry images, so this week I thought I'd make a list of creative and/or Christmas related things as a countdown to Christmas itself. Only two weeks left, can you believe it? Without further ado, here is my countdown to Christmas.

Christmas Countdown


One
  • present that still needs to be knit. Time to get on that.
Two
  • days until my work's holiday party.
Three
  • stockings hung on my fireplace - Andrew has 2.
  • days until my little sister, who isn't so little anymore, turns 18.
Four
  • years it took me to come around to actually enjoying colored lights on Christmas trees. "Hate" is much too strong a word, but I used to really dislike them. Andrew has always loved them, so we had been taking turns switching between them. Finally, this year, I suddenly like them. Andrew is so happy. (Side note: this means this will be our FOURTH Christmas together as a married couple. Time flies!)
Five
  • letters in the word PEACE and candles on my mantle.

Six
  • hours left in the day as I write this.
Seven
  • logs of wood in our firewood holder.
Eight
  • feet tall is my Christmas tree. When people say "trees always look smaller when you're outside" they are not lying, and you should maybe listen to them. It fits though (barely) so it's all good!


Nine
  • candles that I can see from where I sit. Winter = more candles please.
Ten
  • ingredients in the fried black beans I made to go with dinner tonight. I'll post the recipe tomorrow.
Eleven
  • porcelain figures in the Nativity scene in my living room. My mom used to put this out each year, for almost as long as I can remember. I've been searching for a version of my own, but this year she said I could take it home and put it up myself. (Thanks, Mom!)


Twelve
  • skeins of yarn that arrived from KnitPicks last week, tempting me to jump right back into knitting for ME instead of finishing up making presents.
Thirteen
  • days until Christmas Eve, when family festivities begin.
Fourteen
  • days until Christmas.


What are you making? 

Are you counting down the days until Christmas? Making any Christmas gifts or decorations this year? If you have any quick, simple decor ideas I'd love to hear them. Come chat!

Wednesday, December 4, 2013

WAYM Wednesday: Spinning Progress and a Primer


Hello again! I hope you all had a great Thanksgiving, and maybe even participated in the #CraftFriday movement. I stayed off of social media for much of the holiday, but you can be sure I was crafting for most of it regardless :-). Here's what I've been making lately:


This is natural, undyed 100% Merino wool that I purchased at Rhinebeck Sheep & Wool Festival this year. I'm spinning it up on a hand-made drop spindle that my father-in-law built for me. My plan, which so far seems to be working, is to produce a 2-ply fingering weight yarn. I'm working with 4 oz, so, going by standard yardage amounts, in the end I should end up with between 300-500 yards of finished product. I'm managing to produce a single that is fairly consistent and very close to lace-weight, so this may all work out as planned.

At Thanksgiving, my father took a video of me spinning away. (And check it out, I'm wearing my finished Oshima sweater! I hope to write an FO and pattern review post for this Friday, once I get pictures back from my sister.)


The video prompted a comment from a family friend, who asked if I could give a few more details on the spinning process so she could share it with her students.

I am by no means an expert at any of this, but I can hopefully provide some good background information for anyone looking to either get started with handspinning, or just to understand how fibers are processed into cloth. Let's get started!

Fluff


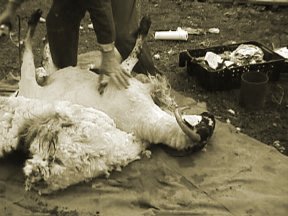
There are many steps taken between the time a sheep is shorn and when a hand-spinner might pick up some wool to spin. Skirting is likely done first. This is the process of removing the shorter, coarser, undesirable portions of the fleece, which are usually around the edges. Doing so ensures that the final processed wool will be even, which is better for consistent spinning (scroll down for a discussion of staple length). Cleaning the fleece involves removing vegetable matter (sometimes referred to in the spinning community as VM) and dirt, which can be done by picking over and/or shaking out the fleece. Washing or scouring is done next to further clean the fleece and remove some of the naturally-occurring sheep oils (lanolin) from the fiber. 

Once that is done, you might end up with something like this:


While you technically could spin directly from this, producing a lock-spun yarn, it would be very labor-intensive and might not be very consistent. (But if you're interested, check out this Knitty article about lock-spinning.) Instead, the fleece usually goes through a combing or carding process to align the fibers and produce wool that is easier and faster to spin.

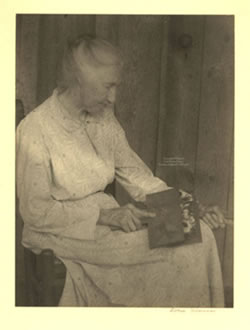
In the olden days, wool was carded by hand:


On an industrial scale, modern carding looks something like this:


Wikipedia has a good article on carding that I recommend reading if you're interested in learning more. Smaller, portable drum carders are also available for home use, but they carry a not-insignificant price tag (around $500 at the lowest end). For these reasons, most hand-spinners tend to start with wool that has been already cleaned, carded, and packaged for spinning.

Here's where I start:


Carded fiber may be sold as roving, top, batts, rolags, and many other preparations. Spinning Daily has a nice handout that explains each variety. The preparation you choose determines the kind of yarn you can spin from it. The dividing line most often used is whether you spin worsted or woolen. Classic spinning literature defines the difference this way: in worsted spinning, fibers are well-aligned and parallel to the final product, creating a dense single. In woolen spinning, fibers are mis-aligned and spun perpendicular to the final product, which traps air and creates a fuzzy, lofty single. There is some controversy over this but I won't get into that here. Links: Knitty article on worsted spinning, Knitty article on woolen spinning.

So far, I have only spun worsted-style from combed top. Here's a look at the wool that I'm currently working with. (This is the other half of what will become my 2-ply.)


The top was about 5" wide straight out of the package. I like to split the top into thinner sections before starting. In this form, the fibers are all aligned parallel to each other in a long, continuous, overlapping mass. It can be easily separated by pulling apart two sides of the top, as shown below. It's a bit like playing with cotton candy.


For this fiber, I knew I wanted to make a 2-ply (I'll explain plying below) using 4 ounces (out of the 8 I had purchased). To do so, I broke the top in half lengthwise and then in half again. I split each half into thirds before proceeding to spin.

One last thing to mention here is staple length. This refers to the average length of the individual fibers that make up the top. To measure this, grab one end of the top, and with the other hand begin pulling the opposite side. Keep sliding your hands further apart until a tuft of wool separates out from the top. 


The process of spinning involves drafting or drawing out a thinner portion of fiber from a wide section, by pulling in the same direction as the fibers. The fibers slide along one another until the desired diameter is achieved and you stop pulling. Staple length determines how your drafting experience will go. Shorter staple length fibers are more difficult to spin, so in general longer is better for starting out. This wool has about a 5" staple length, which is great for a beginner spinner like me. 

Do you feel overloaded with information yet? I sure did when I started my getting into all of this. As you can see, a lot goes on before we even get to the actual spinning process. 

One more thought, and then I'll leave the rest for another post.

Yarn Construction: Ply and Twist


Take a look at any commercial yarn, rope, or string, and you'll see that it is composed of 2 or more smaller strands twisted together. This is called plying, and it is done to increase the strength of the finished product. The degree of twist in the yarn also affects strength. A loosely spun (low-twist) single-ply yarn will be very soft, but it will break and pill easily. A tightly spun (high-twist) multi-ply yarn feels harder, but is much more durable. Note that neither of these is necessarily better when we are talking about garment construction - it all depends on what the yarn will be used for in the end. Clara Parkes had a great article in the Fall 2013 edition of knit.wear that shows how knitting the same yarn differently can  yield stronger or softer results. 

What does this mean for handspinners? When beginning a new spinning project, if you want to control your end product, you must decide on 1) the desired diameter of your finished yarn and 2) the desired number of plies (and potentially the plying method to use), in order to determine what size single you need to spin. 

Final Thoughts


In a future post, I'll describe my drop spindle, how to build your own if you'd like (it was less than $5), and how the actual spinning and plying work.


In the meanwhile, take a look around your home at all the textiles surrounding you and clothing you.


Just think: in the past, every single strand had to be spun by hand. Not even counting the effort to knit or weave it all together, it's an enormous amount of work to fathom. To me, it brings a whole new appreciation to the mechanization that was brought on by the industrial revolution and refined into the manufacturing plants we have today. Some may think it silly to indulge in a hobby that ignores all of that progress and goes back to the ways of early civilization. But the truth is, it is AMAZING that we can even think of this as a hobby or meaningless past-time now. I think it is incredibly important to hold on to these kinds of foundational (in the civilization-building sense) skills. 

Plus, in the end it is a whole lot of fun. And you'll never look at a sheep the same way again.


What are You Making? 

Come chat!


Wednesday, November 27, 2013

WAYM Wednesday: WIP Roundup


Hey everyone! Time for another What Are You Making Wednesday, and I promised a WIP roundup last time, so that's what I'm going to do. I'm not so sure whether anyone is actually interested in how many random in-progress crafty things I have tucked into corners of my house, but this is almost more for my edification: if I publicly list all of my WIPs, it might help incentivize me to finish them before starting on a bunch of new things.

Exciting news: Oshima is no longer on my WIPs list! I'll write up a full FO post and pattern review soon, but for now, here's a teaser photo from my continuing 30x30 challenge:


WIP Roundup


Here's what I've at least started making:

1) Secret Christmas Things

I talked about this last week. Still plugging away. One of my next projects involves dyeing up a bunch of scraps, which is exciting :-)

2) Leopard Blouse

No progress since last week; I haven't had time to sit down at my sewing machine. 


This is a fun project, and it has a lot of potential, but it requires some ripping back right now (and more math) and I just haven't been in the mood for it. I decided a square shawl was not useful, so a long rectangular stole shape would be better. Great idea, but it meant re-doing all of the math for the pattern repeats... and then once the body of the shawl was finished, I skipped the directions to change to a bigger hook size. Bad idea. The thing puckers like crazy and I know it will NOT block out. So, it's been sitting in a bag for a little while. 


I got the yarn specifically for this pattern, swatched and loved how the swatch came out, started right away and got stalled for some unknown reason. I messed up the lace chart a couple of times and had to tink back, which turned it into a not-so-portable project. Then some other big projects entered the scene (sweaters) and the weather started turning, so I made a conscious decision to put this in the "hibernation" pile until Spring. It shouldn't take long to finish it, so I should be able to finish it in time to actually put it to use. With the lace shoulders it doesn't seem suited for layering in colder months. (It's currently also in hiding, so you only get to see a picture of the swatch.)


These are gorgeous. I've finished one glove completely and am up to the hand portion on the second. At this point in the project, though, I was hit with extreme doubt about its usefulness. When would I have use of long, fancy, full-fingered gloves? Unless someone hasn't told me, I haven't been invited to any costume balls lately... So, I'm leaving them in hibernation until I figure that out. The yarn is great, and I wouldn't mind pulling frogging and re-using it, but the gloves are quite elegant and part of me feels like it would be OK if I finished them and they never got used. The other parts of me think that is crazy. 


I started this ages ago after taking Amy Herzog's Fit To Flatter Craftsy class. I highly recommend the class, and I also can now recommend that you should actually follow Amy's advice about wearing ease. I second-guessed her numbers and ended up with something that's a bit too snug on me. It fits, but I unfortunately find the llama content in the yarn just a tad too scratchy for next-to-skin wear on my arms, and it's not loose enough to fit another shirt underneath it. My sister Hannah is just the right size for it though, so I'm hoping to finish it up soon and pass it on to her. 

6) Long Grey Skirt


This is all cut out and ready to go, but I lost a lot of motivation since I started it when it was still summer out and the prospect of wearing the skirt was so far away. Now that it's winter again, I really should pick this back up. All of my skirts are knee-length, which (even with tights) gets chilly. This one is going to go to the floor.

7) Blue floral skirt 


(See center of package - flouncy skirt with pockets & belt loops.) Started this super excited, then lost steam as I started doubting the pattern I had chosen. The fabric is fancy quilting cotton, so it has a fairly nice hand to it but it's very sheer. I'd like to do a full lining on this, but the amount of work that entails has stalled me for the moment. 

8) Brown suit skirt


This one is a real shame - I made one of the skirts from this pattern set as my Very First Skirt Sewing Project (circle skirt, in black suiting material). I still have it and wear it regularly. It's great. The brown fabric here was destined to become the straight, pleat-front skirt shown in the center of the package. However, it seems that in the haze of making my first project, I misplaced or threw out all of the instructions. I have the pattern pieces, just not the cutting layouts or construction notes. Online searches haven't turned up any solutions to my problem. I might just go to Joann's one of these days, pretend to evaluate the pattern, and take a quick read through the notes while at the store. 

9) Spinning

Oh yeah, I suppose my ongoing spinning work counts as a WIP, too.


Like my setup? This is my hi-tech spinning box, aka an old shoebox. It has a couple of nifty holes poked in it, whereby the spindle can be inserted and mounted so that the yarn can be pulled off of it. The tip of the spindle sticks out the side, so I can rest my shoe on it to tension it. A real lazy-kate would be nice.


I got this Merino at Rhinebeck. It spins beautifully - the stuff I used for my first spinning project was an absolute pain to draft, but this drafts and spins like buttah. Very addicting.

I think that's it! 9 isn't too bad. I thought it might be worse once I started actually digging through my craft supplies to see what was in there. There weren't any surprises that I had forgotten about, so that's good. 

What are you making?

Do you tend to be a 'monogamous' crafter, only working on one project at a time until it's complete? Or do you keep several projects going at once, so you can switch between them as your fancy strikes? Do you ever make resolutions to finish x number of projects before starting another one? Come chat in the comments! 

Wednesday, November 20, 2013

In Which There Are Many Sneak Peaks

Hello again, and welcome to another WAYM Wednesday!

Today I have a lot of little sneaky closeups of things in progress that I can't tell you about yet. Last year I set out to Make All The Christmas Gifts, which was a lot of fun but required started in May. This year I wanted to focus on smaller but still meaningful gifts, as well as knitting for the people I didn't knit for last year.

Closeups of Secret Things!


Pretty pinked edges
Turned corners
My first time knitting with an 'exotic' fiber. It's pretty awesome.
Hmmm, what's that? Coming up next on the needles...
This one is done. Lovely colors.
This one is also done. Fun with GIMP image filters!

In Other News


My sewing room is finally done being painted and is all back in order. The house feels SO much better now - I hadn't realized how much it was affecting me to have my crafty supplies in total disarray, all over the house, falling in and out of bins, and never where I thought they were, but it was apparently stressing me out. All better now! I promise to post pics of the semi-finished workspace as soon as I get it cleaned up again soon. It is currently a very active space.

Here's my latest sewing-garment-in-progress: the Leopard Blouse. Usually I am not a huge fan of animal prints, but leopard is great.

I've had this top for many years, and I've all but worn it out:


The construction is quite simple, so I thought I'd have a go at drafting a pattern from it and remaking it. If it all works out, I'll share what I did as a tutorial, but for now here are a few work-in-progress shots for you!


Front & back pieces, partially finished
Closeup

Closeup: to the left is the back of the top, which is gathered slightly with an elastic casing, and to the right is the front, which is gathered and finished with a hem facing (to which several ruffles will be attached to match the original).

Oshima


Finally, my Oshima's arms are all attached, and the cowl-neck is well underway. I had some missteps with sewing mattress stitch at first, and had to re-do the sewing a couple of times, but I'm quite happy with how it turned out. You can't even see the seam! Magic. Once the cowl is done all I'll need to do is wet-block it and it will be ready to wear. My goal is to have it done by the end of the week, or at the very least in time to wear on Thanksgiving weekend.


Looking Ahead


When I started this whole adventure, I thought I'd have no problem blogging a few times a week. As you can see from my posts so far that's not really happening...but I'm hoping to step it up as I get better at this. Next week, I PROMISE to at the very least do a WIP roundup on Wednesday. I will hereby document and publish for the world to see my entire collection of in-progress items. I have a feeling it will add up to a lot more than I think once I actually pull everything out. I guess that's the whole point of doing the exercise, though, right?

Till then, happy crafting!


What are you making today?