
Hello again! I hope you all had a great Thanksgiving, and maybe even participated in the #CraftFriday movement. I stayed off of social media for much of the holiday, but you can be sure I was crafting for most of it regardless :-). Here's what I've been making lately:

This is natural, undyed 100% Merino wool that I purchased at Rhinebeck Sheep & Wool Festival this year. I'm spinning it up on a hand-made drop spindle that my father-in-law built for me. My plan, which so far seems to be working, is to produce a 2-ply fingering weight yarn. I'm working with 4 oz, so, going by standard yardage amounts, in the end I should end up with between 300-500 yards of finished product. I'm managing to produce a single that is fairly consistent and very close to lace-weight, so this may all work out as planned.
At Thanksgiving, my father took a video of me spinning away. (And check it out, I'm wearing my finished Oshima sweater! I hope to write an FO and pattern review post for this Friday, once I get pictures back from my sister.)
The video prompted a comment from a family friend, who asked if I could give a few more details on the spinning process so she could share it with her students.
I am by no means an expert at any of this, but I can hopefully provide some good background information for anyone looking to either get started with handspinning, or just to understand how fibers are processed into cloth. Let's get started!
Fluff
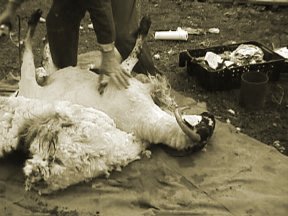
There are many steps taken between the time a sheep is shorn and when a hand-spinner might pick up some wool to spin. Skirting is likely done first. This is the process of removing the shorter, coarser, undesirable portions of the fleece, which are usually around the edges. Doing so ensures that the final processed wool will be even, which is better for consistent spinning (scroll down for a discussion of staple length). Cleaning the fleece involves removing vegetable matter (sometimes referred to in the spinning community as VM) and dirt, which can be done by picking over and/or shaking out the fleece. Washing or scouring is done next to further clean the fleece and remove some of the naturally-occurring sheep oils (lanolin) from the fiber.
Once that is done, you might end up with something like this:

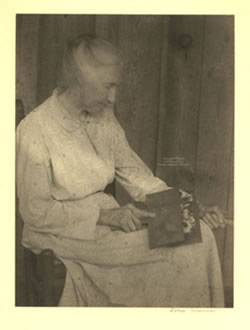
In the olden days, wool was carded by hand:
On an industrial scale, modern carding looks something like this:

Wikipedia has a good article on carding that I recommend reading if you're interested in learning more. Smaller, portable drum carders are also available for home use, but they carry a not-insignificant price tag (around $500 at the lowest end). For these reasons, most hand-spinners tend to start with wool that has been already cleaned, carded, and packaged for spinning.
Here's where I start:

Carded fiber may be sold as roving, top, batts, rolags, and many other preparations. Spinning Daily has a nice handout that explains each variety. The preparation you choose determines the kind of yarn you can spin from it. The dividing line most often used is whether you spin worsted or woolen. Classic spinning literature defines the difference this way: in worsted spinning, fibers are well-aligned and parallel to the final product, creating a dense single. In woolen spinning, fibers are mis-aligned and spun perpendicular to the final product, which traps air and creates a fuzzy, lofty single. There is some controversy over this but I won't get into that here. Links: Knitty article on worsted spinning, Knitty article on woolen spinning.
So far, I have only spun worsted-style from combed top. Here's a look at the wool that I'm currently working with. (This is the other half of what will become my 2-ply.)

The top was about 5" wide straight out of the package. I like to split the top into thinner sections before starting. In this form, the fibers are all aligned parallel to each other in a long, continuous, overlapping mass. It can be easily separated by pulling apart two sides of the top, as shown below. It's a bit like playing with cotton candy.

For this fiber, I knew I wanted to make a 2-ply (I'll explain plying below) using 4 ounces (out of the 8 I had purchased). To do so, I broke the top in half lengthwise and then in half again. I split each half into thirds before proceeding to spin.
One last thing to mention here is staple length. This refers to the average length of the individual fibers that make up the top. To measure this, grab one end of the top, and with the other hand begin pulling the opposite side. Keep sliding your hands further apart until a tuft of wool separates out from the top.

The process of spinning involves drafting or drawing out a thinner portion of fiber from a wide section, by pulling in the same direction as the fibers. The fibers slide along one another until the desired diameter is achieved and you stop pulling. Staple length determines how your drafting experience will go. Shorter staple length fibers are more difficult to spin, so in general longer is better for starting out. This wool has about a 5" staple length, which is great for a beginner spinner like me.
Do you feel overloaded with information yet? I sure did when I started my getting into all of this. As you can see, a lot goes on before we even get to the actual spinning process.
One more thought, and then I'll leave the rest for another post.
Yarn Construction: Ply and Twist
Take a look at any commercial yarn, rope, or string, and you'll see that it is composed of 2 or more smaller strands twisted together. This is called plying, and it is done to increase the strength of the finished product. The degree of twist in the yarn also affects strength. A loosely spun (low-twist) single-ply yarn will be very soft, but it will break and pill easily. A tightly spun (high-twist) multi-ply yarn feels harder, but is much more durable. Note that neither of these is necessarily better when we are talking about garment construction - it all depends on what the yarn will be used for in the end. Clara Parkes had a great article in the Fall 2013 edition of knit.wear that shows how knitting the same yarn differently can yield stronger or softer results.
What does this mean for handspinners? When beginning a new spinning project, if you want to control your end product, you must decide on 1) the desired diameter of your finished yarn and 2) the desired number of plies (and potentially the plying method to use), in order to determine what size single you need to spin.
Final Thoughts
In a future post, I'll describe my drop spindle, how to build your own if you'd like (it was less than $5), and how the actual spinning and plying work.
In the meanwhile, take a look around your home at all the textiles surrounding you and clothing you.
Just think: in the past, every single strand had to be spun by hand. Not even counting the effort to knit or weave it all together, it's an enormous amount of work to fathom. To me, it brings a whole new appreciation to the mechanization that was brought on by the industrial revolution and refined into the manufacturing plants we have today. Some may think it silly to indulge in a hobby that ignores all of that progress and goes back to the ways of early civilization. But the truth is, it is AMAZING that we can even think of this as a hobby or meaningless past-time now. I think it is incredibly important to hold on to these kinds of foundational (in the civilization-building sense) skills.
Plus, in the end it is a whole lot of fun. And you'll never look at a sheep the same way again.

What are You Making?
Come chat!
No comments:
Post a Comment